As an Amazon Associate, we earn from qualifying purchases with no additional costs for you.
Ceramic knives were very popular when they first made their appearance on the market, and people were buying them up quickly and fast! The ceramic knife trend has calmed down a little since then, but there are still some quality ceramic knives available. What ceramic knife owners found is that these knives do eventually get dull, and then the challenge is how to sharpen a ceramic knife.
Sharpening a ceramic knife requires diamond sharpening stones and then following these steps.
- Assess the knife edge.
- Prepare the diamond stone.
- Get your angle right.
- Right technique and pressure.
- Sharpen the knife, maintain angle and pressure.
- Progress up the grits.
- Re-examine the edge.
Ceramic knives certainly hold their edge for a long time, but, like all knives, they do eventually become dull with use. Because of the different materials that these knives are made from, many people don’t know where to start when it comes to sharpening their ceramic knives.
The process is not difficult, and once you learn the basic principles and have the right tools, you will be able to restore your ceramic knife’s keen edge!
If you are interested in checking out the best sharpeners for ceramic knives you can find them by clicking here (Amazon link).

Why Are Ceramic Knives Hard To Sharpen?
This is a question that we hear a lot, and it is actually not entirely accurate. Ceramic knives are not hard to sharpen, but to many people, they are intimidating to sharpen.
This is mostly because people become flummoxed by the different materials that the knife is made from, and they are not quite sure how to sharpen the knife or what tools to use for the sharpening process.
Another reason that ceramic knives have gained a reputation for being difficult to sharpen is that they are fragile.
It takes very little pressure in a lateral direction to snap the blade or chip chunks out of the edge.
Another significant reason for ceramic knives being hard to sharpen is that traditional knife sharpening stones such as the various types of whetstones are simply not hard enough to cut the extremely hard ceramic material that these knives are constructed from!
All of these reasons have served to increase the perception that ceramic knives are difficult to sharpen, and indeed, they are hard to sharpen without the correct tools.
However, with the right tools, they are no more difficult to sharpen than any other knife; in fact, with certain tools, they are even easier to sharpen than traditional steel knives.
What Tools Do You Need To Sharpen Ceramic Knives?
Essentially, the only knife sharpening abrasive that is hard enough to cut the ceramic material are diamond stones.
Diamond stones are nothing new in the knife sharpening sector and have been used for a long time in the sharpening of steel blade knives. However, a diamond abrasive knife sharpener is the only type of abrasive that is effective for sharpening ceramic knives.
There are a number of versions of diamond-based knife sharpeners, and these can all function to sharpen ceramic knives to different degrees. These tools include the following.
- Diamond stones
- Diamond rods
- Electric sharpeners with diamond abrasives
Diamond rods and electric sharpeners all work the same way with ceramic knives as they do with steel knives, except that you use a lot less pressure when using them on ceramic knives.
For this reason, we will focus our step-by-step ceramic knife sharpening guide on the diamond stone sharpening method since these types of stones are what most people are more familiar with for steel knives. Sharpening ceramic knives require a different approach compared to normal knife sharpening tactics.
Using Diamond Stones To Sharpen Ceramic Knives
Flat diamond stones are a good option for a sharpening tool for ceramic knives. They give you a lot of control over the sharpening process, and you can take your time getting accustomed to the process.
With a set of diamond stones, you will also have more versatility in the sharpening functions that you can perform on the knife edge. You will be able to perform the following on a ceramic knife with diamond stones.
- Repair the chipped edge of the ceramic knife.
- Sharpen the edge of the ceramic knife.
- Hone the edge of the ceramic knife.
To perform all these functions, you will need a set of diamond stones in multiple grits rather than a single stone.
We would recommend the following grit progression for the stones; a low grit stone of between 325-grit and 400-grit to repair any nicks or chips in the blade, a pair of sharpening grist at 600-grit, and 1000-grit, and finally a higher grit of about 1200-grit to hone the edge.
There is no need to use water on the diamond stones, so they can be used dry to sharpen your ceramic knives.
Here are the simple steps that you can follow to re-establish the edge on your ceramic knives and make them useful kitchen tools once again.
Assess The Ceramic Knife Edge

Ceramic knives wear and become dull differently from steel knives. On steel knives, when a sharp knife becomes dull, it is often because the thin, sharp edge has rolled over and simply needs to be re-aligned with a strop or a hone.
On a ceramic knife, the material is too hard and brittle to roll over, so the cause of the knife becoming dull is that the brittle edge sustains chips and nicks, reducing the ability of the knife to cut efficiently.
Assessing the dullness of the ceramic knife will let you know which grit of stone to start the sharpening process with.
If your ceramic knife is very dull, it will require starting on the lowest grit diamond stone to remove the large chips from the edge.
If your knife is only moderately dull, you can start on one of the two sharpening stones to make the edge sharp one more.
If you have only noticed the knife slightly losing its edge, then you may only need to touch up the edge on the highest grit diamond stone.
Prepare Your Diamond Stone
You need a solid surface to work on with your diamond stones when sharpening your knives on them. Some stones come with a holder that has a non-slip base that you can use to secure the stone while you work.
For others that don’t have this feature, you may need to purchase a non-slip mat to place under the stone while you sharpen the knife.
Do not use water or any other lubricant on the diamond stones when you use the diamond stones with your ceramic knives.
Next, you need to set the knife upon the stone to begin the sharpening process.
Get The Angle Right
Ceramic knives are generally thinner than steel knives, so the angle at which you sharpen these knives must be lower than what you would generally use for steel knives.
On most kitchen knives, you would sharpen at an angle of 20-degrees or a little less. On ceramic knives, you need to use an even shallower angle, closer to between 18 and 15-degrees. This means that you would need to angle the knife on the stone at a shallower angle than what you think.
The angle is the first part of the technique that is important to get right when sharpening ceramic blades; now, we will move on to the other important sharpening technique aspects.
Get The Technique Right
Because of the difference in the material of the ceramic knives, you need to handle the blade on the stone differently from a steel blade. The first difference in technique is one of pressure.
Lateral pressure on the side of a ceramic knife is probably your worst enemy when trying to sharpen a ceramic knife on a stone.
Pressure at the wrong angle can cause the brittle blade to snap off, in which case the knife would be pretty much ruined.
The amount of pressure required to snap a ceramic knife blade in this way is surprisingly less than what you think, so light pressure is the key.
The second part of the sharpening technique that is different is placing equal pressure along the surface of the blade. To achieve this, you need to hold the knife differently.
When sharpening a steel knife, the knife is generally held by the handle, and the blade is passed over the surface of the stone. This would place too much pressure on a ceramic blade and could cause the blade to snap.
To achieve this even pressure, you need to have one hand choking up high on the handle and partially on the heel of the blade, and the four fingers of your other hand should rest on the flat of the blade towards the tip of the knife.
This prevents putting uneven pressure on the blade by only holding the handle and reduces the risk of snapping the blade.
What this means is that your hands and fingers are closer to the edge of the knife, and therefore, you should take extra care to prevent cutting yourself on the blade.
It would probably be a good decision to wear a pair of cut-resistant gloves till you become familiar with the process and the feel of the technique.
The following is a summary of the safety precautions necessary when sharpening ceramic knives to protect the knife from damage and you from injury.
- Use Light Pressure: Ceramic is a brittle material and can easily snap if too much pressure is applied. When sharpening, use light, even pressure across the blade, to prevent it from chipping or breaking.
- Proper Handling: Hold the knife differently when sharpening a ceramic blade. One hand should be high on the handle and partially on the heel of the blade, while the fingers of your other hand should rest on the flat of the blade towards the tip. This helps distribute pressure evenly and reduces the risk of snapping the blade.
- Wear Cut-Resistant Gloves: Your hands and fingers will be closer to the edge of the knife during the sharpening process. Wearing a pair of cut-resistant gloves can provide an extra layer of protection against accidental cuts.
- Avoid Lateral Pressure: Applying pressure in a lateral direction can cause the ceramic blade to snap. Always move the knife in a direction that’s parallel to the blade when sharpening.
- Use the Right Tools: Only diamond stones are hard enough to effectively sharpen ceramic knives. Using other types of sharpening stones can damage the knife and potentially lead to accidents.
Remember, safety should always be your top priority when sharpening knives. By following these precautions, you can ensure a safe and effective sharpening process for your ceramic knives.
TIP: The right technique is important to avoid ruining your whetstones. Check out the common mistakes that can ruin your whetstone in the article below:
5 Ways To Ruin A Whetstone (Avoid These Mistakes)
Sharpen The Ceramic Knife

Now comes the actual process of sharpening. Slide the knife blade from heel to tip across the stone while maintaining the same angle and pressure, pushing the sharp edge across the stone.
You would use the action of pushing the sharp edge across the stone on the lower grit stones, but as you progress to higher grit stones, especially the honing stone, you would reverse this action and pull the sharp edge across the stone towards the spine of the knife.
This action is much the same as sharpening with a steel knife, but you would generally need much fewer passes. Generally, about 6 to 8 passes across the stone on each side of the blade will be sufficient to get the edge you need.
Progress Up The Grits
After you have completed a cycle of 6 to 8 passes on a stone, move up to the next highest grit of stone in the sequence.
If you needed to perform a repair on the blade, you would have started with the lowest grit stone, then 400-grit. Once you have completed the passes on this stone, move up to the rough sharpening stone, the 600-grit stone.
A ceramic knife sharpens differently from a steel knife in that you will not be able to feel a burr forming on the sharp edge of the blade.
Because of the lack of a burr, there is no way to tell how well your sharpening is progressing. You simply need to work through all the grits doing 6 to 8 passes on each side of the blade on each grit. You will test the sharpness at the end.
The 600-grit stone will put a decent edge on the blade but moving up to the 1000-grit will refine the edge and improve the sharpness.
On the 1000-grit stone and moving up to the 1200-grit stone, you should change the motion of the blade on the stone to be one where you pull the knife towards the spine rather than pushing towards the edge.
Evaluate The Ceramic Knife Edge
Once you have completed all the passes of the knife over the progressive grits, including the 1500-grit honing, it is time to test the sharpness of the blade.
It is difficult to see the knife becoming sharp during the process, and there is no indication of success by the raising of a burr as there is on steel knives.
You will need to cut something to test the sharpness of the ceramic blade. Many people check the sharpness by cutting through a piece of thin paper or by slicing through a ripe tomato or an apple.
If the sharpness of the blade is not quite where you like it to be, then you can go back to the 1000-grit stone and do a few more passes over this stone and repeat on the 1500-grit stone as well.
It is not necessary or recommended to go back to the lowest grit and go through all the grits of stones from the beginning. This would be counter-productive since it would ruin the edge that you have already put on the knife.
TIP: Are you afraid of using manual sharpeners without any helpers? Do not worry, you can use knife sharpening systems. Check them out in the article below:
Ultimate Guide: Best Knife Sharpening Systems for Beginners
Recommended Diamond Stone Set

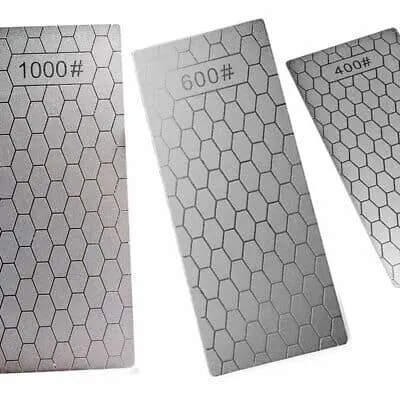
It is generally more cost-effective to buy sharpening stones in a set, which is why we can recommend the 3PCS 400, 600, 1000# Diamond Plate Knife Sharpening set.
This set offers three basic stones, one for fixing and two for sharpening and refining the edge on the ceramic knife.
The advantage of diamond stones is that you don’t have to use them exclusively for your ceramic knives, but you can use them on your steel knives as well. The only stone missing from the set would be the higher grit 1200 or 1500-grit stone for the final finish on the ceramic knife.
If you want to see the current prices for Diamond Stone Set you can find them by clicking here (Amazon link).
To complete the set with a 1200-grit stone, the Ultra Sharp Diamond Sharpening Stone Extra Fine 1200 Grit will be a good finishing stone for your ceramic knives.
PRO TIP: We personally use diamond plates by Atoma. They are quite expensive but of the top quality with a very long service life. The initial costs are higher but you have an option of buying replacing diamond skin for all Atoma plates. The costs of replacing diamond skin are lower than the cost of buying a new diamond plate.
So if you are going to use diamond plates regularly and want to get the best quality on the market, check out the four Atoma diamond plates listed below. By the way, Atoma diamond plates are not only the best for sharpening ceramic knives but they are the best choice for flatting your whetstones too.
Atoma Diamond Sharpener Coarse Grade 140 Grit + Replacement Skin (Amazon link)
Atoma Diamond Sharpener Medium 400 Grit (Amazon link)
Atoma Diamond Sharpener Fine 600 Grit (Amazon link)
Atoma Diamond Sharpener Super Fine 1200 Grit (Amazon link)
Conclusion
Sharpening ceramic knives is not as difficult as it may seem when you first tackle the task. It does, however, require diamond stones rather than traditional whetstones and different techniques.
If you use the same techniques that you use to sharpen your steel knives, you will find out to your frustrations that it will actually dull the ceramic knives even further.
You need to approach ceramic knife sharpening from the mindset that this is a completely different material. The ceramic material wears differently from steel, sharpens differently to steel, feels different to steel, and therefore requires a different technique than when sharpening steel.
Once you learn how the material reacts to the sharpening, it is not difficult to adjust your grip and your action slightly, and the sharpening process will have a more positive outcome.
TIP: Do you know what sharpeners are the best for pocket knives? Find out the best sharpeners for pocket knives in the article below:
The 4 Best Knife Sharpeners For Pocket Knives
